
![]()
Offline conversion tracking is very important in the current era because leads to actual sales journey always happen offline. So the offline tracking should be in place for tracking the actual performance of the campaigns and convincing the business owners about the return on Ad spend.
I am going to reveal the most effective offline conversion tracking technique for Google Ads. That will help you to track the sales happens through form submission and phone call leads.
Scenario example:
- Someone clicks on your search Ad
- Visiting the landing page
- Submitting the form
- A lead received in your CRM
- A salesperson assigned to the lead
- Then the project discussion, negotiation, discussion, negotiation,
- Sales closed, happy ending…!!!
In most cases, you will lose the control or track of the leads after step 3. Because the actual sales process happens offline, that maybe through calls, emails, direct visits, etc… So enabling the offline conversion tracking will help Google Ads to retain control over the leads and optimizing the campaigns for a better return on ad spend.
See the 5 simple steps to enable offline tracking.
Step 1: Enabled auto-tagging.
Step 2: Setup GCLID (Google Click Identifier) capturing in the website and store it in a browser cookie. It’s a parameter that’s appended to the landing page URL when someone landed on the page through one of your ads. I recommend Google Tag Manager for this.
Setup GCLID capturing using Google Tag Manager.
- Login to your Google Tag Manager and create a new custom HTML tag
- Copy-paste the below code into it
- Set a trigger to fire when a PPC landing page viewed
- Save the tag and publish the container
CODE for GTM
<script>
function getParam(p) {
var match = RegExp(‘[?&]’ + p + ‘=([^&]*)’).exec(window.location.search);
return match && decodeURIComponent(match[1].replace(/\+/g, ‘ ‘));
}function getExpiryRecord(value) {
var expiryPeriod = 90 * 24 * 60 * 60 * 1000; // 90 day expiry in millisecondsvar expiryDate = new Date().getTime() + expiryPeriod;
return {
value: value,
expiryDate: expiryDate
};
}function addGclid() {
var gclidParam = getParam(‘gclid’);
var gclidFormFields = [‘gclid_field’, ‘foobar’]; // all possible gclid form field ids here
var gclidRecord = null;
var currGclidFormField;var gclsrcParam = getParam(‘gclsrc’);
var isGclsrcValid = !gclsrcParam || gclsrcParam.indexOf(‘aw’) !== -1;gclidFormFields.forEach(function (field) {
if (document.getElementById(field)) {
currGclidFormField = document.getElementById(field);
}
});if (gclidParam && isGclsrcValid) {
gclidRecord = getExpiryRecord(gclidParam);
localStorage.setItem(‘gclid’, JSON.stringify(gclidRecord));
}var gclid = gclidRecord || JSON.parse(localStorage.getItem(‘gclid’));
var isGclidValid = gclid && new Date().getTime() < gclid.expiryDate;if (currGclidFormField && isGclidValid) {
currGclidFormField.value = gclid.value;
}
}window.addEventListener(‘load’, addGclid);
</script>
Step 3: Pass the GCLID to CRM along with the lead data.
Step 4: Create a new conversion in Google Ads for importing offline conversions.
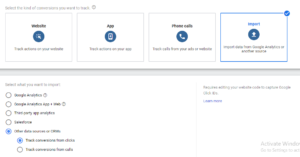 Go to conversions
- Select import
- Select Other data sources or CRMs
- Choose Track conversions from clicks or Track conversions from calls.
- Click Continue and add all the required information.
- Save, you are done.
Step 5: Import conversions from ad clicks into Google Ads
You can import your data into Google Ads by uploading or linking to a file through the Google Ads interface, or by transmitting the data through the Google Ads API (AdWords API).\
Reference: https://support.google.com/google-ads/answer/7014069